Export Stems from your Session
It can be helpful to quickly export individual Tracks from your Session. For instance, you might wish to send the Tracks to someone, to prepare a different mix or remix the Session. The Export Stems feature in Fender Studio Pro provides an easy way to accomplish this.
If you're interested in creating a mixdown of your Session instead of exporting stems, see Mixing Down. The following section will cover exporting stems and the various stem export options available to you.
Select Tracks and Channels
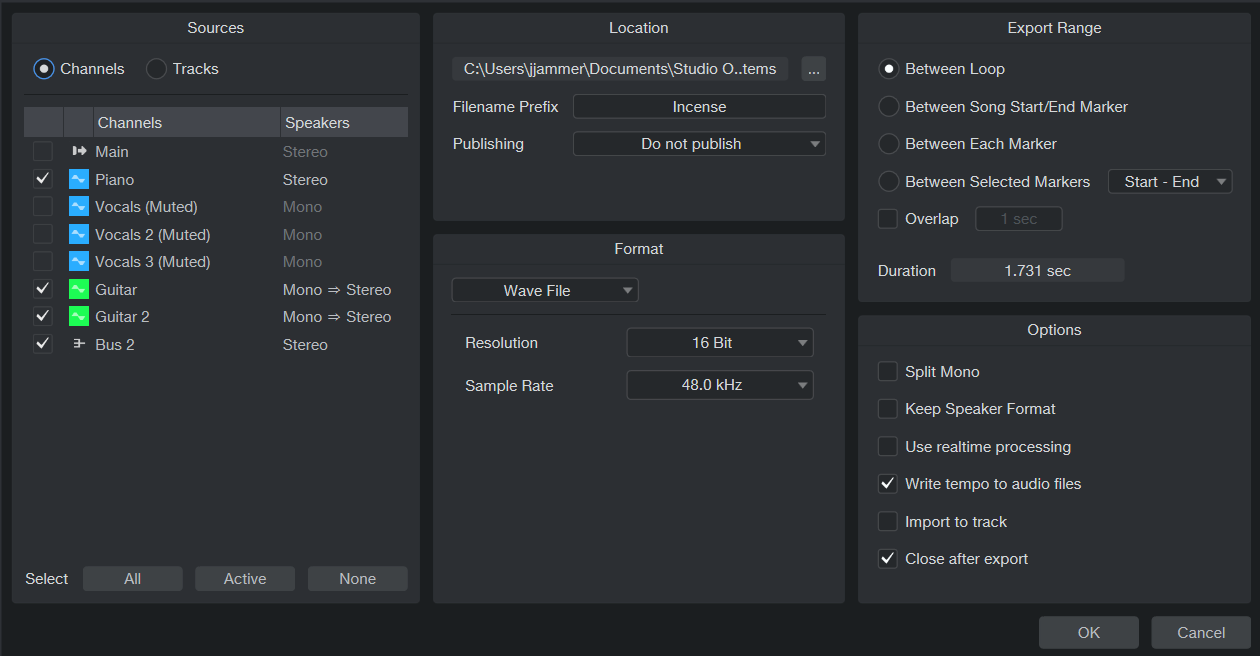
Once the Export Stems dialog opens, you can see two tabs labeled Tracks and Channels in the “Sources” section on the far left. The list of Tracks reflects the Tracks in the Arrange view, while the list of Channels reflects the list of Channels in the Console. Muted Tracks and Channels are unchecked by default, and can be identified by a (Muted) indicator. Select the Tracks and Channels you wish to export by checking each Track or Channel in the list.
You can easily select all Tracks, select only active Tracks, or deselect all Tracks, by pressing the Select All/Active/None buttons below the Track list.
Note that the audio file created for any selected Track or Channel is the equivalent of soloing the Track or Channel in the Console and listening to the result. The audio file includes the results of all Inserts on the Track or Channel. If you don’t want the Inserts included in the exported audio, disable them before exporting.
Location
You can select a location and name for the exported files in the top section of the Export Stems menu. Click on the [...] button to choose a file location. Click on the file name, type in a new name, and press [Enter] to choose a name for the file. The name of each Track in the Session that is being exported is appended to the user-specified file name.
The Publishing menu lets you choose to send your stems to Fender Notion software (choose "Send to Notion"), upload them to Fender Studio Pro+ (choose "Upload to Fender Studio Pro+ ") or a connected SoundCloud account (choose "Upload to Soundcloud"), once the stem export is completed. For more information on working with Notion in combination with Fender Studio Pro, see Working with Notion. For more information on working with SoundCloud, see SoundCloud Integration. For more detailed information on uploading to Fender Studio Pro+ see Fender Studio Pro+ Integration.
Format
Choose from the Wave, AIFF, FLAC, CAF, Ogg Vorbis, M4A, AAC/ALAC, or MP3 file formats, and then choose the desired resolution and sample rate. The MP3 format allows the additional option to export at a Constant or Variable bit rate.
Export Range
-
Choose the Session Content option to export all content in the timeline. This option only regards the events on audio tracks and instrument tracks (no automation, markers, chords, etc.).
-
Choose the Between Loop option to only export the range of your Session between the Left and Right Locators.
-
Choose Between Session Start/End Marker to export the range of your Session between the Session Start and End Markers, as seen in the Marker Track.
-
Choosing Between Each Marker exports separate audio files for the range between each marker in the Session for each Track, placing them in folders named after the markers.
-
Choosing Between Selected Markers lets you choose a pair of Markers to export the range between. The duration of the range to be exported is displayed in the Duration field. Note that when Between Each Marker is selected, the Duration field still shows the full length of the Session, signifying the total length of audio to be exported rather than the length of any one section as dictated by the Markers.
-
Auto Tail determines the maximum amount of extra time (in seconds) that Studio Pro will include after the last event when exporting a Mixdown. This ensures that any natural decay or lingering effects — such as reverb or delay — are fully rendered instead of being cut off at the end of the exported file. This option is only available when “Session Content” is selected.
Options
The bottom section of the Export Stems menu has several options that affect how the files are created:
-
Check Split Mono exports all multichannel output to separate mono files.
-
Check Keep Speaker Format to keep the channel/track speaker format even if the track is connected to a bus/output that has a different speaker format.
- Check Use Realtime Processing if you wish to export your Tracks in real time. This option should be used if your Session requires external MIDI instruments or external hardware processing, so that note data and audio flow to and through those external sources in real time during the export process.
-
Check Write tempo to audio files if you would like to write the tempo information to the audio files.This is useful if you want to retain the stem’s tempo information for use in another project.
- Check Import to Track if you would like the exported Tracks to be imported to new Tracks in your Session.
- Check Close After Export if you would like to close the Export Tracks as Audio Files menu after exporting your Tracks and open the Export path in Finder/Explorer.